INSTALLATION PROCEDURE 1. INSPECT DIFFERENTIAL VACUUM ACTUATOR ASSEMBLY (See page 2. INSTALL DIFFERENTIAL VACUUM ACTUATOR ASSEMBLY
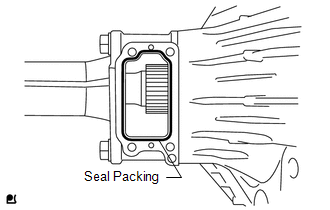
(b) Clean the contact surfaces with any residual FIPG material using gasoline or alcohol. (c) Apply seal packing to the differential tube as shown in the illustration. Seal packing: Toyota Genuine Seal Packing 1281, Three Bond 1281 or equivalent HINT: Install the differential vacuum actuator assembly within 10 minutes of applying seal packing.
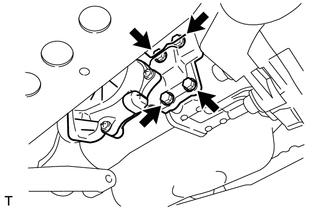
(e) Install the differential vacuum actuator assembly onto the differential tube. (f) Apply adhesive to 2 to 3 threads of each bolt end. Adhesive: Toyota Genuine Adhesive 1324, Three Bond 1324 or equivalent (g) Install the 4 bolts. Torque: 21 N·m {210 kgf·cm, 15 ft·lbf} (h) Connect the actuator hose. (i) Connect the actuator connector. 3. INSTALL NO. 1 ENGINE UNDER COVER |
Toyota Tundra Service Manual > Engine Immobiliser System (w/o Smart Key System): How To Proceed With Troubleshooting
CAUTION / NOTICE / HINT HINT: Use this procedure to troubleshoot the engine immobiliser system. *: Use the Techstream. PROCEDURE 1. VEHICLE BROUGHT TO WORKSHOP NEXT 2. CUSTOMER PROBLEM ANALYSIS HINT: In troubleshooting, confirm that the problem symptoms have been accurately identified. Preconception ...

 )
)