REMOVAL CAUTION / NOTICE / HINT HINT:
PROCEDURE 1. REMOVE REAR DOOR FRAME GARNISH LH 2. REMOVE REAR DOOR INSIDE HANDLE BEZEL PLUG LH 3. REMOVE REAR UPPER DOOR ARMREST BASE PANEL LH 4. REMOVE REAR DOOR ARMREST COVER LH 5. REMOVE REAR DOOR TRIM BOARD SUB-ASSEMBLY LH
6. REMOVE REAR NO. 1 SPEAKER ASSEMBLY (a) Remove the 3 screws. 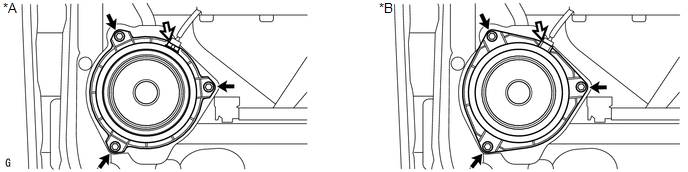 Text in Illustration Text in Illustration
NOTICE: Do not touch the cone part of the speaker. (b) Disconnect the connector and remove the rear No. 1 speaker assembly. 7. REMOVE REAR NO. 2 SPEAKER ASSEMBLY  Text in Illustration Text in Illustration
(a) Detach the 3 claws and remove the rear No. 2 speaker assembly. |
Toyota Tundra Service Manual > Steering Column Assembly(for Manual Tilt And Manual Telescopic Steering Column): Components
COMPONENTS ILLUSTRATION *1 COWL SIDE TRIM BOARD LH *2 FRONT DOOR SCUFF PLATE LH *3 INSTRUMENT SIDE PANEL LH *4 LOWER INSTRUMENT PANEL FINISH PANEL SUB-ASSEMBLY LH *5 LOWER NO. 1 INSTRUMENT PANEL AIRBAG ASSEMBLY *6 NO. 3 AIR DUCT SUB-ASSEMBLY *7 HOOD LOCK CONTROL LEVER - - N*m (kgf*cm, ft.*lbf): Spec ...


