INSTALLATION CAUTION / NOTICE / HINT HINT:
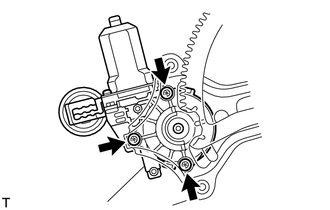
PROCEDURE 1. INSTALL POWER WINDOW REGULATOR MOTOR ASSEMBLY LH (a) Apply MP grease to the sliding and rotating areas of the regulator motor.
2. INSTALL REAR DOOR WINDOW REGULATOR SUB-ASSEMBLY LH (a) for Double Cab: Install the rear door window regulator sub-assembly LH (See page
(b) for CrewMax: Install the rear door window regulator sub-assembly LH (See page
3. INSTALL REAR DOOR GLASS SUB-ASSEMBLY LH (a) for Double Cab: Install the rear door glass sub-assembly LH (See page
(b) for CrewMax: Install the rear door glass sub-assembly LH (See page
4. INSTALL REAR DOOR REAR LOWER WINDOW FRAME SUB-ASSEMBLY LH (a) for Double Cab: Install the rear door rear lower window frame sub-assembly LH (See page
(b) for CrewMax: Install the rear door rear lower window frame sub-assembly LH (See page
5. INSTALL REAR DOOR GLASS RUN LH (a) for Double Cab: Install the rear door glass run LH (See page (b) for CrewMax: Install the rear door glass run LH (See page 6. INSTALL REAR DOOR SERVICE HOLE COVER LH (a) for Double Cab: Install the rear door service hole cover LH (See page
(b) for CrewMax: Install the rear door service hole cover LH (See page
7. INSTALL REAR NO. 2 DOOR TRIM BRACKET (a) for Double Cab: Install the rear No. 2 door trim bracket (See page
(b) for CrewMax: Install the rear No. 2 door trim bracket (See page
8. INSTALL REAR DOOR TRIM BOARD SUB-ASSEMBLY LH (a) for Double Cab: Install the rear door trim board sub-assembly LH (See page
(b) for CrewMax: Install the rear door trim board sub-assembly LH (See page
9. INSTALL REAR DOOR FRAME GARNISH LH (a) for Double Cab: Install the rear door frame garnish LH (See page
(b) for CrewMax: Install the rear door frame garnish LH (See page
10. INSTALL REAR UPPER DOOR ARMREST BASE PANEL LH (a) for Double Cab: Install the rear upper door armrest base panel LH (See page
(b) for CrewMax: Install the rear upper door armrest base panel LH (See page
11. INSTALL REAR DOOR INSIDE HANDLE BEZEL PLUG LH (a) for Double Cab: Install the rear door inside handle bezel plug LH (See page
(b) for CrewMax: Install the rear door inside handle bezel plug LH (See page
12. CONNECT CABLE TO NEGATIVE BATTERY TERMINAL NOTICE: When disconnecting the cable, some systems need to be initialized after the cable
is reconnected (See page |
Toyota Tundra Service Manual > Steering Column Assembly(for Manual Tilt And Manual Telescopic Steering Column): Reassembly
REASSEMBLY PROCEDURE 1. INSTALL STEERING COLUMN BRACKET SPACER (a) Fix the steering column in a vise between aluminum plates or a cloth. Then install the steering column bracket spacer to the steering column. NOTICE: Install the steering column bracket spacer so that it is facing in the direction sh ...

 ).
).