Components COMPONENTS ILLUSTRATION  Replacement REPLACEMENT CAUTION / NOTICE / HINT HINT:
PROCEDURE 1. REMOVE FRONT WHEEL 2. DISCONNECT FRONT DISC BRAKE CALIPER ASSEMBLY LH 3. REMOVE FRONT DISC
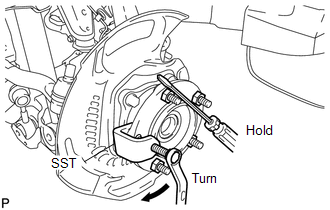
4. REMOVE FRONT AXLE LH HUB BOLT
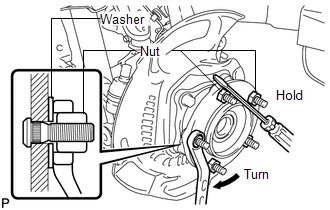
5. INSTALL FRONT AXLE LH HUB BOLT
(b) Using a screwdriver or equivalent to hold the hub, turn the hub nut until the bottom surface of the hub bolt head touches the axle hub. (c) Remove the washer and hub nut. NOTICE: Do not damage the threads of the hub bolts. 6. INSTALL FRONT DISC 7. CONNECT FRONT DISC BRAKE CALIPER ASSEMBLY LH 8. INSTALL FRONT WHEEL Torque: for Aluminum Wheel : 131 N·m {1336 kgf·cm, 97 ft·lbf} for Steel Wheel : 209 N·m {2131 kgf·cm, 154 ft·lbf} |
Toyota Tundra Service Manual > Air Conditioning System(for Manual Air Conditioning System): System Description
SYSTEM DESCRIPTION 1. GENERAL (a) The air conditioning system has the following controls: Control Outline Manual Control The air conditioning amplifier controls the damper positions (air inlet control damper, air mix control damper and mode control damper) and blower speed in accordance with the pos ...