REGISTRATION
PROCEDURE
1. NOTICES WHEN REGISTRATION PROCEDURE
NOTICE:
Make sure to check the items listed below before proceeding with troubleshooting.
- Do not perform "Immobiliser Code Reset" (all key ID erasure) until all of
the malfunctions and symptoms have been confirmed and resolved. If all key ID
erasure is performed without confirming or resolving malfunctions, key registration
will be unable to be performed, resulting in unnecessary part replacement.
2. DESCRIPTION OF CODE REGISTRATION
(a) The door control transmitter assembly has 2 codes: the key code (immobiliser
code) and the wireless code. Both of these codes need to be registered. For the
wireless code registration procedures, refer to Wireless Door Lock Control System.
Click here 
3. KEY REGISTRATION PROCEDURES WHEN ADDING OR REPLACING KEY OR WHEN KEY IS LOST
HINT:
- The following procedures require the use of the Techstream:
- - New key code registration
- - Additional key code registration
- - Key code erasure
- A maximum of 5 key codes can be registered.
|
Customer Request/Condition
|
Registration Procedure Condition
|
Procedure
|
Refer to
|
|
Registering additional door control transmitter assembly
|
Customer must bring at least 1 door control transmitter assembly.
|
1. Register additional door control transmitter assemblies as necessary
(additional key code registration).
|
PROCEDURE "B"
|
- Replacing a door control transmitter assembly
- Making a lost door control transmitter assembly unusable
HINT:
After key code erasure, any remaining door control transmitter assemblies
that are not registered at this time cannot be used. Therefore, after key
code erasure, register all remaining door control transmitter assemblies.
|
Customer must bring at least 1 door control transmitter assembly.
|
1. Using remaining door control transmitter assembly, clear all registered
door control transmitter assemblies except one (key code erasure).
|
PROCEDURE "C"
|
|
2. Register additional door control transmitter assemblies as necessary
(additional key code registration).
|
PROCEDURE "B"
|
|
All door control transmitter assemblies are lost
|
-
|
1. Reset all door control transmitter assemblies (all keys ID erasure
(key code reset)).
|
PROCEDURE "D"
|
|
2. Register all door control transmitter assemblies new key ID registration.
|
PROCEDURE "A"
|
4. PART REPLACEMENT AND KEY REGISTRATION PROCEDURES
(a) The following table shows ECU replacement and key registration procedures
for cases in which an ECU has been determined to be malfunctioning during troubleshooting
of the engine immobiliser system.
HINT:
- The following procedures require the use of the Techstream:
- - New key code registration
- - Additional key code registration
- - Key code erasure
- A maximum of 5 key codes can be registered.
|
Malfunctioning ECU
|
Procedure
|
Refer to
|
|
Transponder key ECU assembly
|
1. Replace transponder key ECU assembly.
|
Click here
|
|
2. Register all door control transmitter assemblies.
|
PROCEDURE "A"
|
|
3. Register ECU communication ID.
|
PROCEDURE "E"
|
|
ECM
|
1. Replace ECM.
|
for 1UR-FE: Click here
for 3UR-FE: Click here
for 3UR-FBE: Click here
|
|
2. Register ECU communication ID.
(When replacing the ECM with a used one)
|
PROCEDURE "F"
|
|
Transponder key ECU assembly and ECM
|
1. Replace transponder key ECU assembly.
|
Click here
|
|
2. Replace ECM.
|
for 1UR-FE: Click here
for 3UR-FE: Click here
for 3UR-FBE: Click here
|
|
3. Register all door control transmitter assemblies.
|
PROCEDURE "A"
|
|
4. Register ECU communication ID.
(When replacing the ECM with a used one)
|
PROCEDURE "F"
|
5. KEY REGISTRATION (PROCEDURE "A")
(a) New key code registration (Procedure "A"):
NOTICE:
Make sure that no key codes are registered in the transponder key ECU assembly.
HINT:
- In this mode, a maximum of 2 master key codes can be registered. The master
keys can be registered in any order because the transponder key ECU assembly
can distinguish between different types of door control transmitter assemblies.
- New key codes must be registered with the battery connected. The ignition
switch can be either ON or off.
- When a new transponder key ECU assembly is installed, key codes must be
registered in the transponder key ECU assembly.
Automatic Key Code Registration (New Registration)
|
Procedure
|
Security Indicator Light Condition
|
|
1. Start
|
Blinking
HINT:
Until first door control transmitter assembly is inserted
|
|
2. Insert the master key into the ignition key cylinder.
|
Blinking
|
|
3. Techstream operation
Enter the following menus: Body Electrical / Immobiliser / Utility /
Key Registration
HINT:
After completing the above operation, proceed to the next step in accordance
with the prompts on the Techstream screen.
|
OFF for 1 second and then ON
|
|
4. Remove the door control transmitter assembly and then select Next
on the Techstream.
|
ON
|
|
5. Insert the master key to be registered and then select Next on the
Techstream.
|
OFF for 1 second and then ON
|
|
6. Remove the door control transmitter assembly.
|
ON
|
|
7. End
|
HINT:
- When the engine immobiliser system is operating normally and the door control
transmitter assembly is pulled out, the security indicator light blinks continuously.
- If new key code registration fails, code 2-1 will be output through the
security indicator light. Trying to re-register an already registered door control
transmitter assembly will cause code 2-2 to be output when the door control
transmitter assembly is inserted. If the number of registered key codes exceeds
the maximum limit, code 2-3 will be output through the security indicator light.
The output details are shown below.

(b) End automatic key code registration mode:
Automatic key code registration mode can be forced to end when at least 1 key
code (immobiliser code) has been registered as the master key.
HINT:
Follow the instruction on the Techstream screen to end new key code registration
mode.
6. KEY REGISTRATION (PROCEDURE "B")
(a) Additional registration (Procedure "B"):
HINT:
- A maximum of 5 master key codes can be re-registered.
- Additional key code registration will end if any step is not completed within
the specified time.
- If the ignition key cylinder or the key cylinder set is replaced, remove
the transmitter module from the original master key. Then install the transmitter
module to a new key and use the new key as the master key. If necessary, use
this master key to register other door control transmitter assemblies.
NOTICE:
When the ignition key cylinder has been replaced, locking and unlocking of doors
is possible with the new master key transmitter module (removed from the original
master key). However, the new master key will not be able to lock and unlock doors
through the door key cylinder. Keep the original master key. If the battery in the
new master key transmitter module fails, the original master key can be used to
lock and unlock doors through the door key cylinder.
Additional Registration
|
Procedure
|
Time to Complete Operation
|
Security Indicator Light Condition
|
|
1. Start
|
-
|
Blinking
HINT:
Until first door control transmitter assembly is inserted
|
|
2. Insert the previous registered master key into the ignition key cylinder
and turn the ignition switch to ON.
|
Within 120 seconds
|
OFF
|
|
3. Techstream operation
Enter the following menus: Body Electrical / Immobiliser / Utility /
Key Registration
HINT:
After completing the above operation, proceed to the next step in accordance
with the prompts on the Techstream screen.
|
ON
|
|
4. Remove the master key.
|
Within 20 seconds
HINT:
After the Techstream instruction
|
ON
|
|
5. Insert the door control transmitter assembly to be registered in the
ignition key cylinder.
|
Within 10 seconds
|
Blinking
|
|
6. After 60 seconds, the door control transmitter assembly is registered.
HINT:
The security indicator light turns off to indicate that the door control
transmitter assembly has been registered.
|
-
|
OFF
|
|
7. Remove the door control transmitter assembly.
|
-
|
Blinking
|
|
8. End
|
HINT:
- A brief outline of a key code registration procedure is shown above. For
detailed information, refer to the Techstream screen.
- When the engine immobiliser system is operating normally and the door control
transmitter assembly is pulled out, the security indicator light blinks continuously.
- If key code registration fails during additional key code registration,
code 2-1 will be output through the security indicator light. Trying to re-register
a previously registered door control transmitter assembly will cause code 2-2
to be output when the door control transmitter assembly is inserted into the
ignition key cylinder. If the number of registered key codes exceeds the maximum
limit, code 2-3 will be output through the security indicator light. Details
of code output are shown in procedure "A".
7. KEY REGISTRATION (PROCEDURE "C")
(a) Key code erasure (Procedure "C"):
HINT:
- Performing this procedure will erase all key codes except for the master
key which is used for erasing the key codes. In order to use a door control
transmitter assembly whose code has been erased, a new key code must be registered.
- This procedure will be canceled if each step is not completed within the
specified time.
Key Code Erasure
|
Procedure
|
Time to Complete Operation
|
Security Indicator Light Condition
|
|
1. Start
|
-
|
Blinking
HINT:
Until first door control transmitter assembly is inserted
|
|
2. Insert the previous registered master key in the ignition key cylinder
and turn the ignition switch to ON.
|
Within 120 seconds
|
OFF
|
|
3. Techstream operation
Enter the following menus: Body Electrical / Immobiliser / Utility /
Transponder Code Erasure
HINT:
After completing the above operation, proceed to the next step in accordance
with the prompts on the Techstream screen.
|
ON for 1 second and then OFF
|
|
4. Remove the master key.
|
Within 10 seconds
HINT:
After the Techstream instruction
|
Blinking
|
|
5. End
|
HINT:
- A brief outline of a key code registration procedure is shown above. For
detailed information, refer to the Techstream screen.
- When the engine immobiliser system is operating normally and the door control
transmitter assembly is pulled out, the security indicator light blinks continuously.
8. KEY REGISTRATION (PROCEDURE "D")
(a) All key code erasure (Procedure "D"):
HINT:
- To perform this procedure, at least 1 door control transmitter assembly
should be registered to the transponder key ECU assembly.
- This procedure can be performed using either a registered or unregistered
door control transmitter assembly.
All Key Code Erasure
|
Procedure
|
Time to Complete Operation
|
Security Indicator Light Condition
|
|
1. Start
|
-
|
Blinking
|
|
2. Insert the previous registered master key or unregistered door control
transmitter assembly into ignition key cylinder and turn the ignition switch
to ON.
|
Within 10 minutes
|
ON or OFF
|
|
3. Using TIS, confirm that user and vehicle match.
|
|
4. Techstream operation
Enter the following menus: Body Electrical / Immobiliser / Utility /
Immobiliser Code Reset
HINT:
After completing the above operation, proceed to the next step in accordance
with the prompts on the Techstream screen.
|
Within 15 minutes
|
ON for 1 second and then OFF
|
|
5. Completion of erasure of all key codes is displayed.
|
-
|
ON
|
|
6. End
|
HINT:
- A brief outline of a key code registration procedure is shown above. For
detailed information, refer to the Techstream screen.
- When the engine immobiliser system is operating normally and the door control
transmitter assembly is pulled out, the security indicator light blinks continuously.
9. KEY REGISTRATION (PROCEDURE "E")
(a) ECU communication ID registration (Procedure "E"):
NOTICE:
|
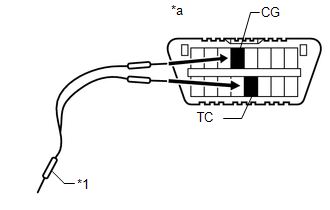
(1) Using SST, connect terminals TC and CG of the DLC3.
SST: 09843-18040
|
|
|
*1
|
SST
|
|
*a
|
Front view of DLC3
|
|
|
(2) Turn the ignition switch to ON and leave the vehicle as is for 30 minutes.
NOTICE:
Do not open and close any door. If a door is opened and closed, start the registration
over again from the procedure 1.
HINT:
Do not start the engine.
(3) Turn the ignition switch off and disconnect SST from terminals TC and CG.
(4) Check that the engine can be started and runs for 3 seconds or more.
10. KEY REGISTRATION (PROCEDURE "F")
(a) ECU communication ID registration (Procedure "F"):
NOTICE:
The ECU communication ID should be registered when the ECM and transponder key
ECU assembly are replaced or when the ECM only is replaced in order to match the
ECU communication ID.
ECU Communication ID Registration
|
Procedure
|
Security Indicator Light Condition
|
|
1. Start
|
OFF
|
|
2. Insert an already registered door control transmitter assembly into
the ignition key cylinder.
|
|
3. Start the engine.
|
|
4. Check that the engine starts and stays on for more than 3 seconds.
|
|
5. End
|
| 

