INSTALLATION CAUTION / NOTICE / HINT
HINT:
- Use the same procedures for the LH side and RH side.
- The procedures listed below are for the LH side.
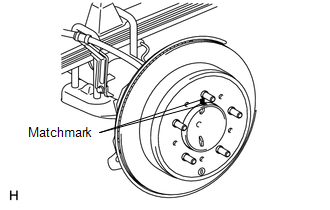
PROCEDURE 1. INSTALL REAR DISC
| (a) Align the matchmarks and install the rear disc. | |
2. ADJUST PARKING BRAKE SHOE CLEARANCE
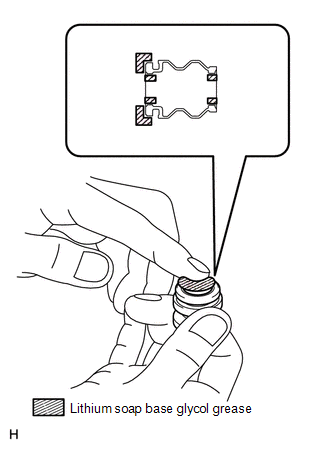
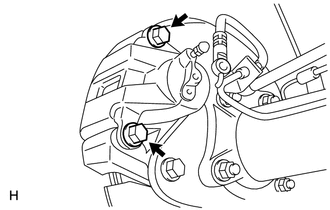
 3. INSTALL REAR DISC BRAKE CYLINDER MOUNTING LH
| (a)
Apply a light coat of lithium soap base glycol grease to the entire
circumference of a new rear disc brake bush dust boot where it contacts
the rear disc brake mounting cylinder, and the entire inner
circumference of both ends. HINT: Apply at least 0.3 g (0.01 oz.) of lithium soap base glycol grease to each rear disc brake bush dust boot.
NOTICE: Apply
a sufficient amount of lithium soap base glycol grease to the entire
circumference of the rear disc brake bush dust boot and rear disc brake
cylinder mounting contact surfaces. | |
| (b) Install the rear disc brake bush dust boot to the rear disc brake cylinder mounting.
NOTICE: Install the boot securely into the grooves of the rear disc brake cylinder mounting. |
|
(c) Install the rear disc brake cylinder mounting with the 2 new bolts.
Torque: 167 N·m {1703 kgf·cm, 123 ft·lbf} 4. INSTALL REAR DISC BRAKE PAD SUPPORT PLATE
NOTICE:
- The pad support plates can be reused if they are securely attached to
the cylinder mounting. Therefore, do not remove the pad support plates
from the cylinder mounting.
- If a pad support plate is removed, replace it with a new one that is supplied with double-sided tape already attached.
- Make sure to clean the cylinder mounting contact surface before attaching the pad support plates.
(a) Clean the cylinder mounting surface where the pad support plates will be attached.
(b) Remove the peeling paper from the double-sided tape, and install 4 new pad support plates to the cylinder mounting.
5. INSTALL PAD WEAR INDICATOR PLATE (a) Install the pad wear indicator plate to the inner disc brake pad.
6. INSTALL REAR DISC BRAKE ANTI-SQUEAL SHIM (a) Install the anti-squeal shims to the each brake pads.
NOTICE: There should be no oil or grease on the friction surfaces of the brake pads and rear disc.
7. INSTALL REAR DISC BRAKE PAD (a) Install the 2 disc brake pads to the disc brake cylinder mounting.
NOTICE:
- When installing the pads, make sure that the disc brake pad support
plates are securely attached to the cylinder mounting. The pad support
plates are attached to the cylinder mounting with double-sided tape.
- If a pad support plate is not securely attached to the cylinder mounting, replace it with a new one.
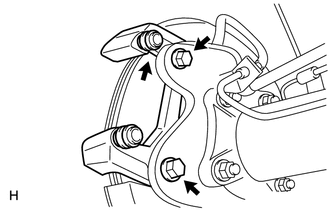
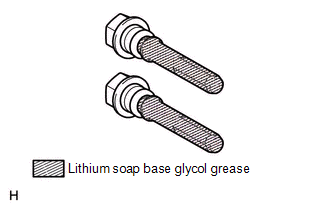
8. INSTALL REAR DISC BRAKE CYLINDER ASSEMBLY LH
| (a) Apply a light coat of lithium soap base glycol grease to the sliding part and seal surface of the 2 slide pins. |
|
| (b) Install the 2 slide pins. Torque: 88 N·m {897 kgf·cm, 65 ft·lbf} |
|
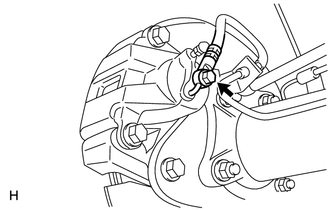
9. CONNECT REAR FLEXIBLE HOSE LH
| (a) Install a new gasket and connect the flexible hose with the new union bolt.
Torque: 30 N·m {306 kgf·cm, 22 ft·lbf} HINT: Install the flexible hose lock securely in the lock hole in the cylinder. |
|
10. BLEED BRAKE LINE
11. INSTALL REAR WHEEL Torque:
for Aluminum Wheel : 131 N·m {1336 kgf·cm, 97 ft·lbf} for Steel Wheel :
209 N·m {2131 kgf·cm, 154 ft·lbf} |