Toyota Tundra Service Manual: Installation

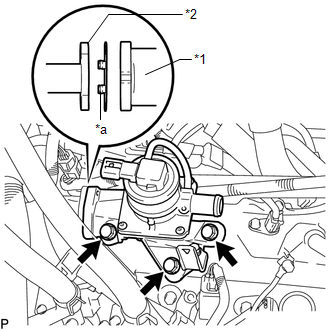
INSTALLATION

PROCEDURE

1. INSTALL AIR SWITCHING VALVE ASSEMBLY

(a) Install a new gasket and the air switching valve assembly with the 3 bolts.

Torque:

24 N·m {245 kgf·cm, 18 ft·lbf}

Text in Illustration

*1

Air Switching Valve Assembly

*2

No. 3 Air Tube

*a

Claw

NOTICE:

Make sure the gasket's claws are not caught between the air switching valve assembly and No. 3 air tube.

(b) Install the 2 bolts.

Torque:

10 N·m {102 kgf·cm, 7 ft·lbf}

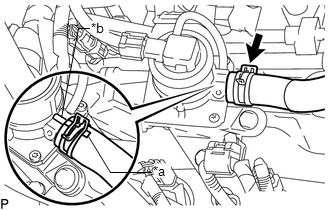
(c) Attach the wire harness clamp to the air switching valve assembly and connect the air switching valve assembly connector.

2. CONNECT NO. 1 AIR HOSE

(a) Align the paint mark with the projection and connect the No. 1 air hose, and slide the clamp to secure the hose.

Text in Illustration

*a

Paint Mark

*b

Projection

HINT:

Make sure the direction of the hose clamp is as shown in the illustration.

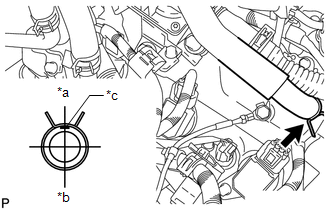
3. CONNECT NO. 3 VENTILATION HOSE

(a) Connect the No. 3 ventilation hose, and slide the clamp to secure the hose.

Text in Illustration

*a

Front

*b

Rear

*c

Paint Mark

HINT:

The direction of the hose clamp is indicated in the illustration.

4. INSTALL AIR CLEANER HOSE ASSEMBLY

5. INSTALL V-BANK COVER SUB-ASSEMBLY

    Inspection

    Removal

    See More:

    Toyota Tundra Service Manual > Windshield Deicer System: Parts Location
    PARTS LOCATION ILLUSTRATION *A for Automatic Air Conditioning System *B for Manual Air Conditioning System *1 WINDSHIELD GLASS - WINDSHIELD DEICER WIRE *2 ENGINE ROOM RELAY BLOCK, JUNCTION BLOCK - WINDSHIELD DEICER RELAY ASSEMBLY (DEICER) - DEICER FUSE *3 DRIVER SIDE JUNCTION BLOCK ASSEMBLY - ECU-IG ...

    Toyota Tundra Owners Manual

    Toyota Tundra Service Manual

    © 2025 Copyright www.ttundra.com
    0.0093