INSTALLATION CAUTION / NOTICE / HINT HINT:
PROCEDURE 1. INSTALL FRONT POWER WINDOW REGULATOR MOTOR ASSEMBLY LH 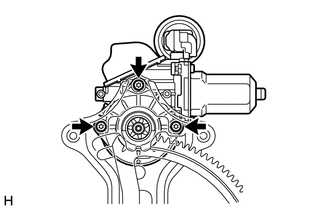
(a) Apply MP grease to the sliding and rotating areas of the regulator motor. (b) Using a T25 ''TORX'' driver, install the front power window regulator motor assembly LH with the 3 screws. Torque: 5.4 N·m {55 kgf·cm, 48 in·lbf} HINT: For a new front window regulator, the installation position of the regulator will be set when the self-tapping screws are installed. 2. INSTALL FRONT DOOR WINDOW REGULATOR SUB-ASSEMBLY LH (a) for Double Cab: Click here (b) for CrewMax: Click here 3. INSTALL FRONT DOOR GLASS SUB-ASSEMBLY LH (a) for Double Cab: Click here (b) for CrewMax: Click here 4. INSTALL FRONT DOOR SERVICE HOLE COVER LH (a) for Double Cab: Click here (b) for CrewMax: Click here 5. INSTALL FRONT NO. 1 DOOR TRIM BRACKET (a) for Double Cab: Click here (b) for CrewMax: Click here 6. INSTALL FRONT NO. 1 SPEAKER ASSEMBLY (a) for Double Cab: Click here (b) for CrewMax: Click here 7. INSTALL FRONT DOOR TRIM BOARD SUB-ASSEMBLY LH (a) for Double Cab: Click here (b) for CrewMax: Click here 8. INSTALL FRONT LOWER DOOR FRAME BRACKET GARNISH LH (a) for Double Cab: Click here (b) for CrewMax: Click here 9. INSTALL FRONT UPPER ARMREST BASE PANEL LH Click here 10. INSTALL FRONT DOOR INSIDE HANDLE BEZEL PLUG LH (a) for Double Cab: Click here (b) for CrewMax: Click here 11. CONNECT CABLE TO NEGATIVE BATTERY TERMINAL NOTICE: When disconnecting the cable, some systems need to be initialized after the cable is reconnected. Click here |
Toyota Tundra Service Manual > Sfi System: Oxygen (A/F) Sensor Signal Stuck Lean (Bank 1 Sensor 1) (P2195-P2198)
DESCRIPTION The A/F sensor generates a voltage* that corresponds to the actual air-fuel ratio. This sensor voltage is used to provide the ECM with feedback so that it can control the air-fuel ratio. The ECM determines the deviation from the stoichiometric air-fuel ratio, and regulates the fuel injec ...


