REMOVAL PROCEDURE 1. PRECAUTION NOTICE: After
turning the ignition switch off, waiting time may be required before
disconnecting the cable from the battery terminal. Therefore, make sure
to read the disconnecting the cable from the battery terminal notice
before proceeding with work (See page 2. DISCONNECT CABLE FROM NEGATIVE BATTERY TERMINAL NOTICE: When disconnecting the cable, some systems need to be initialized after the cable is reconnected (See page
3. REMOVE CENTER LOWER INSTRUMENT COVER 4. REMOVE AIR CONDITIONING CONTROL ASSEMBLY 5. REMOVE NAVIGATION RECEIVER ASSEMBLY
(c) Disconnect each connector and remove the navigation receiver assembly with bracket. 6. REMOVE NO. 1 NAVIGATION WIRE (w/ Satellite Radio)
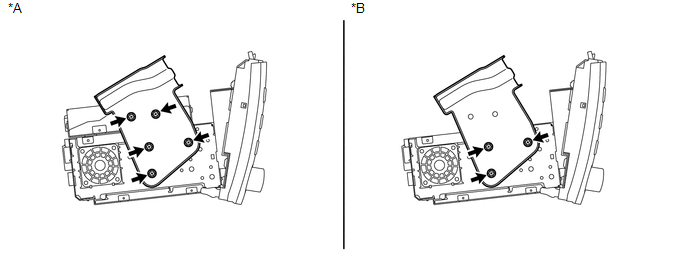
7. REMOVE NO. 1 RADIO RECEIVER BRACKET  Text in Illustration Text in Illustration
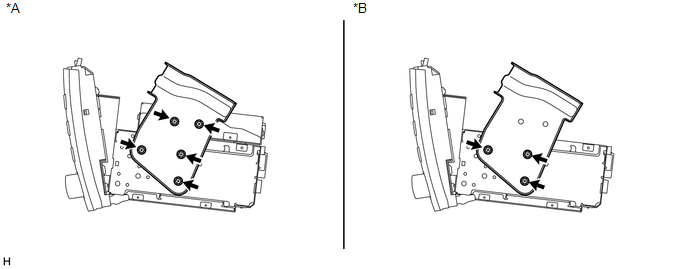
(a) w/ Satellite Radio: Remove the 5 bolts and No. 1 radio receiver bracket. (b) w/o Satellite Radio: Remove the 3 bolts and No. 1 radio receiver bracket. 8. REMOVE NO. 2 RADIO RECEIVER BRACKET  Text in Illustration Text in Illustration
(a) w/ Satellite Radio: Remove the 5 bolts and No. 2 radio receiver bracket. (b) w/o Satellite Radio: Remove the 3 bolts and No. 2 radio receiver bracket. 9. REMOVE STEREO COMPONENT TUNER ASSEMBLY (w/ Satellite Radio)
|
Toyota Tundra Service Manual > Meter / Gauge System: Terminals Of Ecu
TERMINALS OF ECU 1. CHECK COMBINATION METER (a) Measure the voltage, resistance and waveform according to the value(s) in the table below. Terminal No. (Symbol) Wiring Color Terminal Description Condition Specified Condition *1: w/ Intuitive Parking Assist System *2: w/ Towing Package *3: The minimu ...