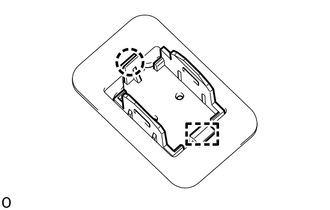
INSTALLATION CAUTION / NOTICE / HINT HINT: A bolt without a torque specification is shown in the standard bolt chart. Click here PROCEDURE 1. INSTALL MICROPHONE CASE
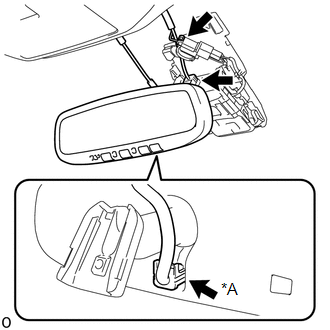
2. INSTALL TELEPHONE MICROPHONE ASSEMBLY Click here 3. INSTALL ROOF HEADLINING ASSEMBLY 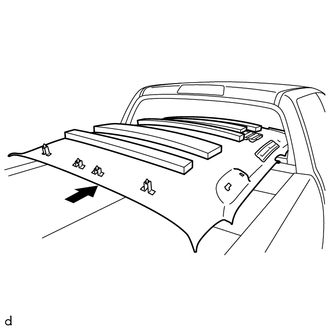
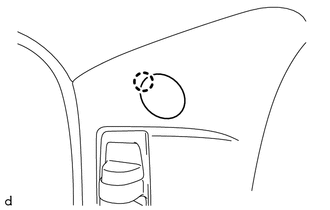
(a) Place the roof headlining assembly into the cabin as shown in the illustration. NOTICE: Be careful not to damage the roof headlining assembly when placing it in the cabin. (b) w/o Sliding Roof: Attach the 4 clips to install the roof headlining assembly. (c) w/ Sliding Roof: Attach the 4 clips and 12 fasteners to install the roof headlining assembly. (d) Attach the 4 wire harness clamps and connect the connector to the front pillar LH. (e) w/ Lane Departure Alert System:
4. INSTALL NO. 1 FORWARD RECOGNITION COVER (w/ Lane Departure Alert System) Click here 5. INSTALL ASSIST GRIP SUB-ASSEMBLY Click here 6. INSTALL VISOR HOLDER Click here 7. INSTALL VISOR ASSEMBLY LH Click here 8. INSTALL VISOR ASSEMBLY RH HINT: Use the same procedure described for the LH side. 9. INSTALL NO. 1 ROOM LIGHT ASSEMBLY Click here 10. INSTALL INNER REAR VIEW MIRROR STAY HOLDER COVER (w/ EC Mirror) Click here 11. INSTALL ROOF CONSOLE BOX ASSEMBLY Click here 12. INSTALL REAR SHOULDER BELT ANCHOR PLATE SUB-ASSEMBLY LH 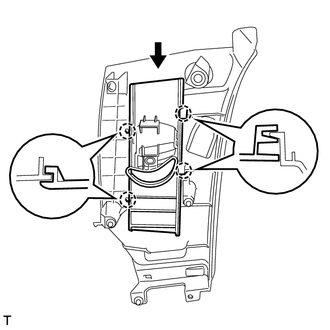
(a) Slide the rear shoulder belt anchor plate sub-assembly LH in the direction shown in the illustration and attach the 4 claws to install it. 13. INSTALL REAR SHOULDER BELT ANCHOR PLATE SUB-ASSEMBLY RH HINT: Use the same procedure described for the LH side. 14. INSTALL FRONT QUARTER TRIM PANEL ASSEMBLY LH (a) Pass the rear seat outer belt assembly through the hole of the front quarter trim panel assembly LH. (b) Attach the 4 clips to install the front quarter trim panel assembly LH. (c) Install the 2 bolts.
15. INSTALL FRONT QUARTER TRIM PANEL ASSEMBLY RH HINT: Use the same procedure described for the LH side. 16. INSTALL LOWER QUARTER TRIM PANEL ASSEMBLY LH (a) Attach the 5 clips to install the lower quarter trim panel assembly LH. (b) Install the rear seat outer belt assembly with the bolt. Torque: 42 N·m {428 kgf·cm, 31 ft·lbf} (c) Attach the 2 claws to install the cover. 17. INSTALL LOWER QUARTER TRIM PANEL ASSEMBLY RH HINT: Use the same procedure described for the LH side. 18. INSTALL NO. 1 BOX SPEAKER ASSEMBLY (w/ Woofer) Click here 19. INSTALL FRONT SHOULDER BELT ANCHOR PLATE SUB-ASSEMBLY LH Click here 20. INSTALL FRONT SHOULDER BELT ANCHOR PLATE SUB-ASSEMBLY RH HINT: Use the same procedure described for the LH side. 21. INSTALL CENTER PILLAR GARNISH LH Click here 22. INSTALL CENTER PILLAR GARNISH RH HINT: Use the same procedure described for the LH side. 23. INSTALL LOWER CENTER PILLAR GARNISH LH Click here 24. INSTALL LOWER CENTER PILLAR GARNISH RH HINT: Use the same procedure described for the LH side. 25. INSTALL FRONT PILLAR GARNISH LH Click here 26. INSTALL FRONT PILLAR GARNISH RH Click here 27. INSTALL REAR DOOR OPENING TRIM WEATHERSTRIP LH (a) Install the rear door opening trim weatherstrip LH. 28. INSTALL REAR DOOR OPENING TRIM WEATHERSTRIP RH HINT: Use the same procedure described for the LH side. 29. INSTALL FRONT DOOR OPENING TRIM WEATHERSTRIP LH (a) Install the front door opening trim weatherstrip LH. 30. INSTALL FRONT DOOR OPENING TRIM WEATHERSTRIP RH HINT: Use the same procedure described for the LH side. 31. INSTALL COWL SIDE TRIM BOARD LH Click here 32. INSTALL COWL SIDE TRIM BOARD RH HINT: Use the same procedure described for the LH side. 33. INSTALL REAR DOOR SCUFF PLATE LH (a) Attach the 8 claws and 2 clips to install the rear door scuff plate LH. 34. INSTALL REAR DOOR SCUFF PLATE RH HINT: Use the same procedure described for the LH side. 35. INSTALL FRONT DOOR SCUFF PLATE LH (a) Attach the 6 claws and 3 clips to install the front door scuff plate LH. 36. INSTALL FRONT DOOR SCUFF PLATE RH HINT: Use the same procedure described for the LH side. 37. INSTALL REAR SEAT ASSEMBLY (for LH Side) Click here 38. INSTALL REAR SEAT ASSEMBLY (for RH Side) Click here 39. INSTALL FRONT SEAT ASSEMBLY (for Center Seat) Click here 40. INSTALL FRONT SEAT ASSEMBLY (for Manual Seat) Click here 41. INSTALL FRONT SEAT ASSEMBLY (for Power Seat) Click here 42. CONNECT CABLE TO NEGATIVE BATTERY TERMINAL NOTICE: When disconnecting the cable, some systems need to be initialized after the cable is reconnected. Click here 43. CHECK SRS WARNING LIGHT Click here |
Toyota Tundra Service Manual > Cylinder Head: Replacement
REPLACEMENT PROCEDURE 1. REPLACE INTAKE VALVE GUIDE BUSH (a) Heat the cylinder head to approximately 80 to 100°C (176 to 212°F). (b) Place the cylinder head on wooden blocks. (c) Using SST and a hammer, tap out the valve guide bush. SST: 09201-10000 09201-01050 SST: 09950-70010 09951-07100 (d) Usi ...