OPERATION CHECK PRECAUTION FOR OPERATION CHECK CAUTION: Use the correct procedure to replace the airbag parts. 
CHECK SRS WARNING LIGHT (a) Primary check (1) Turn the ignition switch to ON and check that the SRS warning light turn on. (2) Turn the ignition switch off. Wait for at least 2 seconds, and then turn the ignition switch to ON. The SRS warning light comes on for approximately 6 seconds and diagnosis of the airbag system (including the seat belt pretensioners) is performed. NOTICE: Turn the ignition switch off when the battery is connected. HINT:
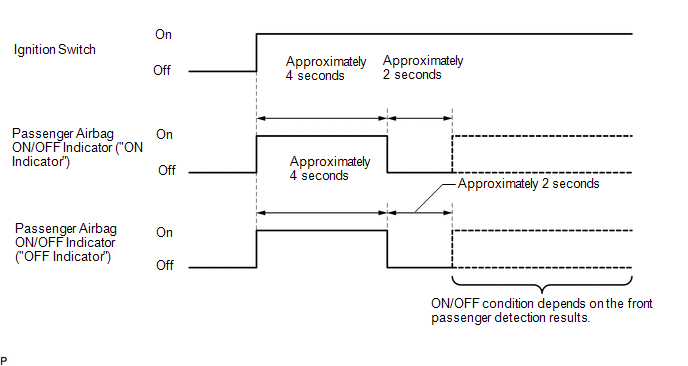
FUNCTION OF PASSENGER AIRBAG ON/OFF INDICATOR (a) Initial check (1) Turn the ignition switch to ON. (2) The passenger airbag ON/OFF indicator comes on for approximately 4 seconds, and then goes off for approximately 2 seconds. (3) Approximately 6 seconds after the ignition switch is turned to ON, the passenger airbag ON/OFF indicator will indicate ON/OFF depending on the following conditions. Indicator Operation
HINT:
CHECK PASSENGER AIRBAG ON/OFF INDICATOR 
(a) Turn the ignition switch to ON. (b) Check that the passenger airbag ON/OFF indicator ("ON" and "OFF") comes on for approximately 4 seconds, and then goes off for approximately 2 seconds. HINT: In order to check the operation of the passenger airbag ON/OFF indicator when approximately 6 seconds have elapsed after turning the ignition switch to ON, refer to the table in the previous step. CHECK HORN BUTTON ASSEMBLY Click here CHECK INSTRUMENT PANEL PASSENGER WITHOUT DOOR AIRBAG ASSEMBLY Click here CHECK FRONT SEAT AIRBAG ASSEMBLY for Manual Seat: Click here for Power Seat: Click here CHECK CURTAIN SHIELD AIRBAG ASSEMBLY for Double Cab: Click here for CrewMax: Click here CHECK LOWER NO. 1 INSTRUMENT PANEL AIRBAG ASSEMBLY Click here CHECK LOWER NO. 2 INSTRUMENT PANEL AIRBAG ASSEMBLY Click here CHECK FRONT SEAT OUTER BELT ASSEMBLY (for Vehicle not Involved in Collision) (a) Perform a diagnostic system check. Click here (b) Visually check for defects with the front seat outer belt assembly installed to the vehicle. (1) The defects to be checked are as follows:
OK: No defects are found. HINT: If any defects are found, replace the front seat outer belt assembly with a new one. CHECK FRONT SEAT OUTER BELT ASSEMBLY (for Vehicle Involved in Collision) (a) Perform a diagnostic system check. Click here (b) Visually check for defects with the front seat outer belt assembly removed from the vehicle. (1) The defects to be checked are as follows:
OK: No defects are found. HINT: If any defects are found, replace the front seat outer belt assembly with a new one. CHECK FRONT AIRBAG SENSOR Click here CHECK NO.2 SIDE AIRBAG SENSOR ASSEMBLY for Double Cab: Click here for CrewMax: Click here CHECK SIDE AIRBAG SENSOR ASSEMBLY (for Vehicle not Involved in Collision) (a) Perform a diagnostic system check. Click here CHECK SIDE AIRBAG SENSOR ASSEMBLY (Vehicle Involved in Collision and Airbag not Deployed) (a) Perform a diagnostic system check. Click here (b) Visually check the side airbag sensor assemblies for defects if a front quarter trim panel assembly of the vehicle or the area around a front quarter trim panel assembly is damaged. (1) The defects are as follows:
OK: No defects are found. HINT: If any of the defects is found, replace the side airbag sensor assembly with a new one. CHECK SIDE AIRBAG SENSOR ASSEMBLY (Vehicle Involved in Collision and Airbag is Deployed) (a) When airbags have deployed as the result of a collision, be sure to replace all side airbag sensor assemblies in the damaged areas (anywhere in need of repair). (b) Visually check the side airbag sensor assemblies in undamaged areas for defects. (1) The defects are as follows:
OK: No defects are found. HINT: If any of the defects is found or a side airbag sensor assemblies has detected a major collision, replace the side airbag sensor assembly with a new one. CHECK SEAT POSITION AIRBAG SENSOR Click here CHECK AIRBAG SENSOR ASSEMBLY for Column Shift Type: Click here for Floor Shift Type: Click here CHECK HARNESS AND CONNECTOR (a) for Vehicle not Involved in Collision (1) Perform a diagnostic system check. (b) for Vehicle Involved in Collision and Airbag not Deployed (1) Perform a diagnostic system check. (c) for Vehicle Involved in Collision and Airbag is Deployed (1) Perform a diagnostic system check. (2) Check any of the wire harnesses in exposed contact with the airbag wire harness for damage. (3) Check the connector of the airbag wire harness for scratches, cracks or damage. | ||||||||||||||||||||||||||
Toyota Tundra Service Manual > Can Communication System: Diagnostic Trouble Code Chart
DIAGNOSTIC TROUBLE CODE CHART HINT: If a trouble code is displayed during the DTC check, inspect the trouble areas listed for that code. For details of the code, refer to the "See page" below. CAN Communication System DTC No. Detection Item DTC Output from See page B1003 ECU Malfunction Central gate ...


