REMOVAL PROCEDURE 1. DISCONNECT CABLE FROM NEGATIVE BATTERY TERMINAL CAUTION: Wait at least 90 seconds after disconnecting the cable from the negative (-) battery terminal to prevent airbag and seat belt pretensioner activation. 2. REMOVE REAR ROOF DRIP SIDE FINISH MOULDING LH
3. REMOVE REAR ROOF DRIP SIDE FINISH MOULDING RH HINT: Use the same procedures described for the LH side. 4. REMOVE REAR SEAT ASSEMBLY LH
5. REMOVE REAR SEAT ASSEMBLY RH
6. REMOVE REAR DOOR SCUFF PLATE LH
7. REMOVE REAR DOOR SCUFF PLATE RH
8. REMOVE REAR DOOR OPENING TRIM WEATHERSTRIP LH (a) Partially remove the rear door opening trim weatherstrip LH so that the lower
quarter trim panel LH and front quarter trim panel LH can be removed (see page
9. REMOVE REAR DOOR OPENING TRIM WEATHERSTRIP RH HINT: Use the same procedures described for the LH side. 10. REMOVE FRONT SHOULDER BELT ANCHOR PLATE SUB-ASSEMBLY LH
11. REMOVE FRONT SHOULDER BELT ANCHOR PLATE SUB-ASSEMBLY RH HINT: Use the same procedures described for the LH side. 12. REMOVE NO. 1 BOX SPEAKER ASSEMBLY
13. REMOVE LOWER QUARTER TRIM PANEL ASSEMBLY LH
14. REMOVE LOWER QUARTER TRIM PANEL ASSEMBLY RH
15. REMOVE FRONT QUARTER TRIM PANEL ASSEMBLY LH
16. REMOVE FRONT QUARTER TRIM PANEL ASSEMBLY RH
17. REMOVE ASSIST GRIP SUB-ASSEMBLY
18. REMOVE NO. 1 ROOM LIGHT ASSEMBLY
19. TEMPORARILY REMOVE ROOF HEADLINING ASSEMBLY (a) It is not necessary to completely remove the roof headlining. Slightly lower
the rear section of the roof headlining (see page 20. REMOVE BACK DOOR SERVICE HOLE COVER (a) Remove the back window regulator connector labeled A. (b) Remove the 12 bolts and nut. (c) Lift the cover upwards to detach the claw labeled B. Then slide the cover to the left to disengage the retainer labeled C and remove the cover. NOTICE: When the cover is removed, the cover may fall and become deformed. 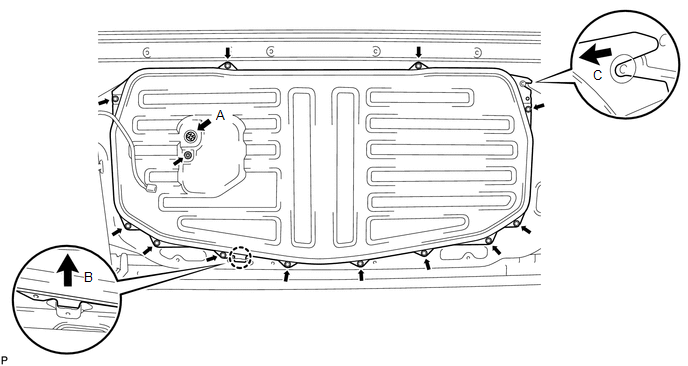
21. REMOVE OUTER BACK DOOR GLASS WEATHERSTRIP ASSEMBLY (a) Using a screwdriver, detach the 9 claws and remove the weatherstrip. HINT: Tape the screwdriver tip before use. 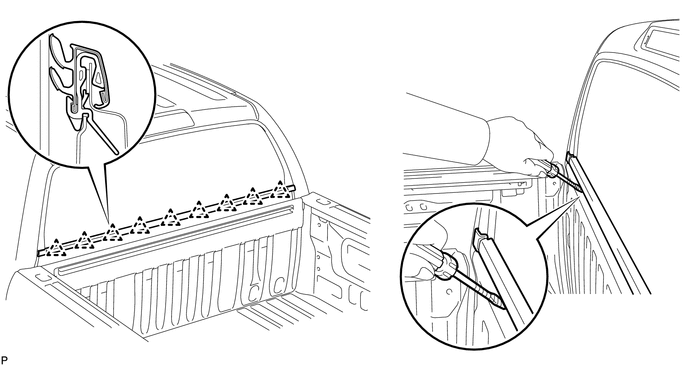
22. REMOVE INNER BACK DOOR GLASS WEATHERSTRIP 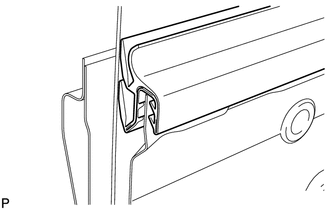
(a) Using a screwdriver, remove the weatherstrip. HINT: Tape the screwdriver tip before use. 23. REMOVE BACK DOOR GLASS RUN 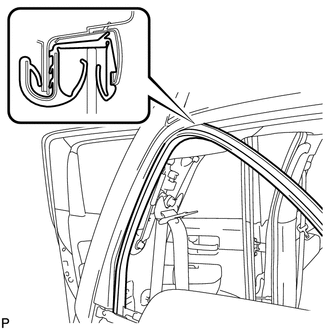
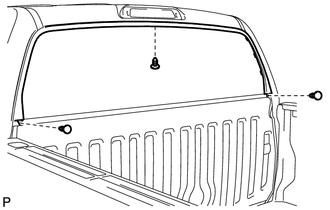
(a) Remove the glass run. 24. REMOVE BACK WINDOW GLASS (a) Connect the cable to the negative (-) battery terminal. (b) Connect the back window regulator connector labeled A. (c) Move the back window glass until the bolts appear in the service holes. (d) Disconnect the back window regulator connector labeled A. (e) Disconnect the cable from the negative battery (-) terminal. (f) Disconnect the 2 defogger connectors labeled B. (g) Remove the 4 bolts. NOTICE: Be careful when removing the bolts as the glass may fall and become damaged. (h) Remove the back window glass. HINT: Remove the glass upward. NOTICE: Be careful not to damage the glass. 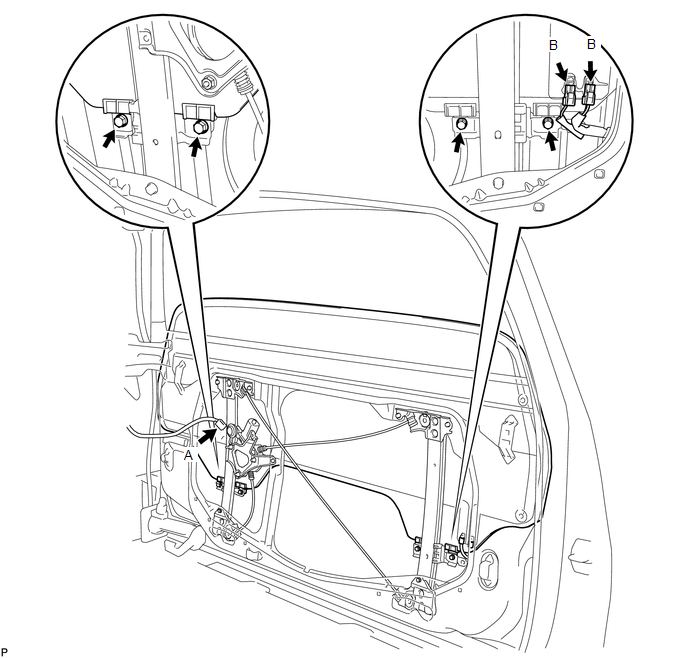
25. REMOVE BACK DOOR POWER WINDOW REGULATOR SUB-ASSEMBLY (a) Remove the 7 bolts and back window regulator. HINT: Remove the regulator through the service hole. NOTICE: Be careful when removing the bolts as the regulator sub-assembly may fall and become damaged. 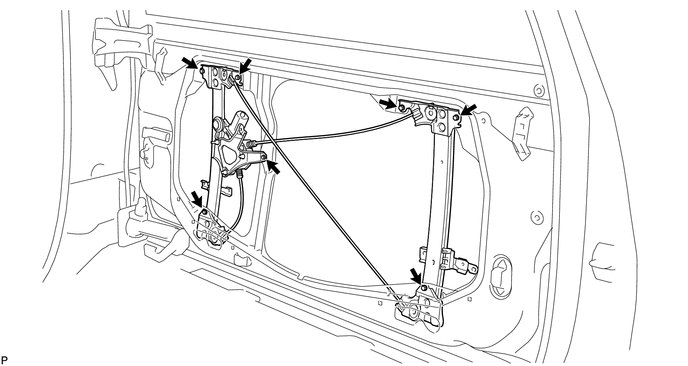
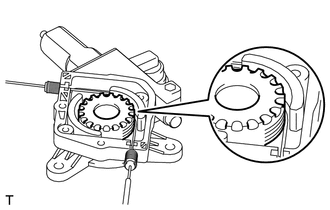
26. REMOVE BACK DOOR POWER WINDOW REGULATOR MOTOR 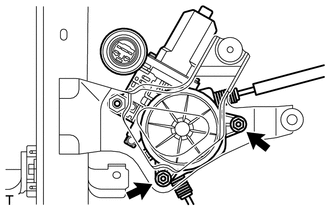
NOTICE: Perform these procedures only when replacing the regulator or motor. (a) Remove the 2 nuts and motor. NOTICE: Be careful when removing the nuts as the motor may fall and become damaged. (b) Remove the 2 screws and cover.
27. REMOVE BACK WINDOW OUTSIDE MOULDING (a) Put a 4 mm (0.157 in.) drill bit into a drill. (b) Wind tape around the drill bit 5 mm (0.196 in.) from the tip of the drill, as shown in the illustration. HINT: Tape the 4 mm (0.157 in.) drill bit to prevent the drill bit from going too deep. (c) Lightly press the drill against the rivets, drill off the flanges of the rivets, and remove the 16 rivets. 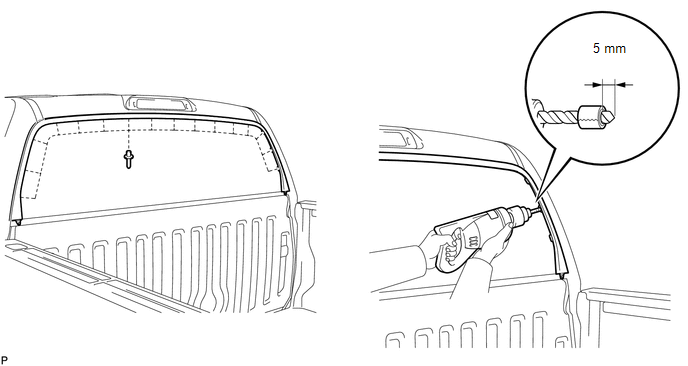
NOTICE:
(d) Using a vacuum cleaner, remove the rivet fragments and shavings from the drilled areas.
28. REMOVE UPPER CAB REAR PILLAR PLATE LH 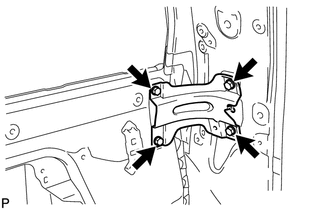
(a) Remove the 4 bolts and upper plate. 29. REMOVE UPPER CAB REAR PILLAR PLATE RH HINT: Use the same procedures described for the LH side. |
Toyota Tundra Service Manual > Power Window Control System(w/ Jam Protection Function): Power Window Switch Malfunction (B2312)
DESCRIPTION The power window regulator sub-assembly consists of the motor, regulator and ECU. The power window regulator motor is driven by operating the power window switch. This DTC is output when the ECU built into the regulator motor determines that the power window switch is stuck. NOTICE: When ...