REMOVAL CAUTION / NOTICE / HINT NOTICE: When replacing the windshield glass of a vehicle equipped with a forward recognition camera, make sure to use a Toyota genuine part. If a non-Toyota genuine part is used, the forward recognition camera may not be able to be installed due to a missing bracket. Also, the dynamic radar cruise control system, forward recognition camera system, lane departure alert system, pre-collision system may not operate properly due to a difference in the transmissivity or black ceramic border. PROCEDURE 1. REMOVE FRONT WIPER ARM AND BLADE ASSEMBLY LH Click here 2. REMOVE FRONT WIPER ARM AND BLADE ASSEMBLY RH Click here 3. REMOVE HOOD TO COWL TOP SEAL Click here 4. REMOVE FRONT FENDER TO COWL SIDE SEAL LH Click here 5. REMOVE FRONT FENDER TO COWL SIDE SEAL RH Click here 6. REMOVE COWL TOP VENTILATOR LOUVER SUB-ASSEMBLY Click here 7. REMOVE FRONT DOOR OPENING TRIM WEATHERSTRIP LH (a) Partially remove the front door opening trim weatherstrip LH so that the front pillar garnish LH can be removed. Click here 8. REMOVE FRONT DOOR OPENING TRIM WEATHERSTRIP RH HINT: Use the same procedures described for the LH side. 9. REMOVE FRONT PILLAR GARNISH LH Click here 10. REMOVE FRONT PILLAR GARNISH RH Click here 11. REMOVE INNER REAR VIEW MIRROR ASSEMBLY Click here 12. REMOVE ROOF CONSOLE BOX ASSEMBLY Click here 13. REMOVE NO. 1 ROOM LIGHT ASSEMBLY Click here 14. REMOVE VISOR ASSEMBLY LH (a) for Double Cab: Click here (b) for CrewMax: Click here 15. REMOVE VISOR ASSEMBLY RH HINT: Use the same procedures described for the LH side. 16. REMOVE VISOR HOLDER (a) for Double Cab, w/o Illumination: Click here (b) for CrewMax, w/o Illumination: Click here 17. REMOVE ASSIST GRIP SUB-ASSEMBLY (a) for Double Cab: Click here (b) for CrewMax: Click here 18. REMOVE COAT HOOK Click here 19. REMOVE NO. 1 FORWARD RECOGNITION COVER (w/ Lane Departure Alert System) Click here 20. REMOVE FORWARD RECOGNITION LATCH (w/ Lane Departure Alert System) Click here 21. REMOVE FORWARD RECOGNITION CAMERA (w/ Lane Departure Alert System) Click here 22. REMOVE FORWARD RECOGNITION WITH HEATER HOOD SUB-ASSEMBLY (w/ Lane Departure Alert System) Click here 23. REMOVE ROOF HEADLINING ASSEMBLY (a) Partially remove the roof headlining. HINT: It is not necessary to completely remove the roof headlining. Slightly lower the front section of the roof headlining so that the windshield glass can be removed in a later step.
24. REMOVE REAR ROOF DRIP SIDE FINISH MOULDING LH Click here 25. REMOVE REAR ROOF DRIP SIDE FINISH MOULDING RH HINT: Use the same procedures described for the LH side. 26. REMOVE ROOF DRIP SIDE FINISH MOULDING LH Click here 27. REMOVE ROOF DRIP SIDE FINISH MOULDING RH HINT: Use the same procedures described for the LH side. 28. REMOVE ROOF DRIP SIDE FINISH MOULDING CLIP Click here 29. REMOVE OUTSIDE WINDSHIELD MOULDING 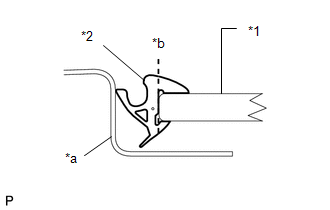
(a) Using a knife, cut off the outside windshield moulding as shown in the illustration. NOTICE: Be careful not to damage the vehicle body. (b) Remove the remaining moulding. HINT: Make a partial cut in the moulding. Then pull and remove it by hand. 30. REMOVE UPPER WINDSHIELD OUTSIDE MOULDING 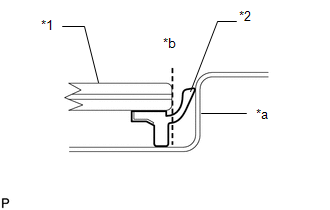
(a) Using a knife, cut off the upper windshield outside moulding as shown in the illustration. NOTICE: Be careful not to damage the vehicle body. (b) Remove the remaining moulding. HINT: Make a partial cut in the moulding. Then pull and remove it by hand. 31. REMOVE WINDSHIELD GLASS 
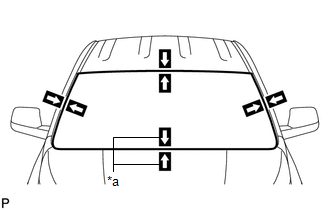
(a) w/ Windshield Deicer: Remove the clip and disconnect the connector. (b) Apply protective tape to the outer surface of the vehicle body to prevent scratches. (c) From the interior, insert a piano wire between the vehicle body and windshield glass as shown in the illustration. (d) Tie objects that can serve as handles (for example, wooden blocks) to both wire ends. NOTICE:
(f) Cut through the adhesive by pulling the piano wire around the windshield glass. NOTICE: Leave as much adhesive on the vehicle body as possible when cutting through the adhesive. (g) Disengage the stoppers.
32. CLEAN WINDSHIELD GLASS 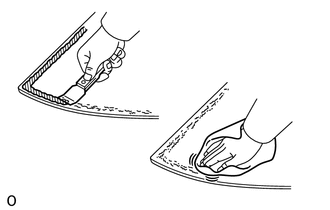
(a) Using a gasket scraper, remove the damaged stoppers, dams and adhesive sticking to the windshield glass. (b) Clean the outer edges of the windshield glass with non-residue solvent. Do not touch the windshield glass surface after cleaning it.NOTICE: Even if using new windshield glass, clean it with non-residue solvent. 33. CLEAN VEHICLE BODY 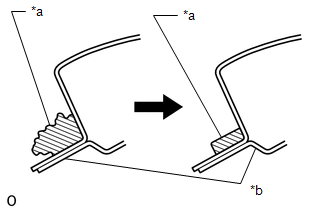
(a) Clean and shape the contact surface of the vehicle body. (1) On the contact surface of the vehicle body, use a knife to cut away excess adhesive as shown in the illustration. HINT: Leave as much adhesive on the vehicle body as possible. NOTICE: Be careful not to damage the vehicle body. (b) Clean the contact surface of the vehicle body with cleaner. HINT: Even if all the adhesive has been removed, clean the vehicle body. |
Toyota Tundra Service Manual > Differential Carrier Assembly(for 1ur-fe): Installation
INSTALLATION PROCEDURE 1. INSTALL REAR DIFFERENTIAL CARRIER ASSEMBLY (a) Clean the contact surfaces of the rear differential carrier and the rear axle housing. (b) Install a new gasket and the differential carrier with the 10 washers and 10 nuts. Torque: 72 N·m {734 kgf·cm, 53 ft·lbf} NOTICE: Be ...