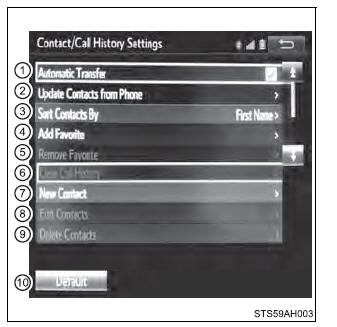
The contact can be transferred from a Bluetooth phone to the system. The contact also can be added, edited and deleted. The call history can be deleted and contact and favorites can be changed. 1. Display the "Phone/Message Settings" screen. 2. Select "Contact/Call History Settings". 3. Select the desired item to be set.
*: For PBAP compatible Bluetooth phones only, this function is available when "Automatic Transfer" is set to off. Update contacts from phone Operation methods differ between PBAP compatible and PBAP incompatible but OPP compatible Bluetooth phones. If your cellular phone is neither PBAP nor OPP compatible, the contacts cannot be transferred. ■ For PBAP Compatible Bluetooth Phones 1. Select "Update Contacts from Phone". 2. Check that a confirmation screen is displayed when the operation is complete. This operation may be unnecessary depending on the type of cellular phone. Depending on the type of cellular phone, OBEX authentication may be required when transferring contact data. Enter "1234" into the Bluetooth phone. If another Bluetooth device is connected when transferring contact data, depending on the phone, the connected Bluetooth device may need to be disconnected. Depending on the type of Bluetooth phone being connected, it may be necessary to perform additional steps on the phone. ■ For PBAP Incompatible but OPP compatible Bluetooth Phones 1. Select "Update Contacts from Phone". 2. Transfer the contact data to the system using a Bluetooth phone. This operation may be unnecessary depending on the type of cellular phone. Depending on the type of cellular phone, OBEX authentication may be required when transferring contact data. Enter "1234" into the Bluetooth phone. To cancel this function, select "Cancel". 3. Check that a confirmation screen is displayed when the operation is complete. ■ Updating the contacts in a different way (From the "Call History" screen) For PBAP compatible Bluetooth phones, this function is available when "Automatic Transfer" is set to off. 1. Display the phone screen. 2. Select the "Call History" tab and select a contact not yet registered in the contact list. 3. Select "Update Contact". 4. Select the desired contact. 5. Select a phone type for the phone number. Registering a new contact to the contact list New contact data can be registered. Up to 4 numbers per person can be registered. For PBAP compatible Bluetooth phones, this function is available when "Automatic Transfer" is set to off. 1. Select "New Contact". 2. Enter the name and select "OK". 3. Enter the phone number and select "OK". 4. Select the phone type for the phone number. 5. To add another number to this contact, select "Yes". ■ Registering a new contact in a different way (From the "Call History" screen) 1. Display the phone screen. 2. Select the "Call History" tab and select a contact not yet registered in the contact list. 3. Select "Add to Contacts". 4. Follow the steps in "Registering a new contact to the contacts list" from step 2. Editing the contact data For PBAP compatible Bluetooth phones, this function is available when "Automatic Transfer" is set to off. 1. Select "Edit Contact". 2. Select the desired contact. 3. Select For editing the name 4. Follow the steps in "Registering a new contact to the contact list" from step 2. For editing the number 4. Follow the steps in "Registering a new contact to the contact list" from step 3. ■ Editing the contacts in a different way (From the "Contact Details" screen) 1. Display the phone screen. 2. Select the "Contacts", "Call history" tab or the "Favorites" tab and select the desired contact. 3. Select "Edit Contact". "E-mail Addresses": Select to display all registered e-mail addresses for the contact. 4. Follow the steps in "Editing the contact data" from step 3. Deleting the contact data For PBAP compatible Bluetooth phones, this function is available when "Automatic Transfer" is set to off. 1. Select "Delete Contacts". 2. Select the desired contact and select "Delete". 3. Select "Yes" when the confirmation screen appears. ■ Deleting the contact in a different way (From the "Contact Details" screen) 1. Display the phone screen. 2. Select the "Contacts", "Call history" tab or the "Favorites" tab and select the desired contact. 3. Select "Delete Contact". 4. Select "Yes" when the confirmation screen appears. Favorites list setting Up to 15 contacts (maximum of 4 numbers per contact) can be registered in the favorites list. ■ Registering the contacts in the favorites list 1. Select "Add Favorite". 2. Select the desired contact to add to the favorites list. Dimmed contacts are already stored as a favorite. 3. Check that a confirmation screen is displayed when the operation is complete. When 15 contacts have already been registered to the favorites list 1. When 15 contacts have already been registered to the favorites list, a registered contact needs to be replaced. Select "Yes" when the confirmation screen appears to replace a contact. 2. Select the contact to be replaced. 3. Check that a confirmation screen is displayed when the operation is complete. Registering contacts in the favorites list in a different way (from the "Contacts" screen) 1. Display the phone screen. 2. Select the "Contacts" tab. 3. Select
When selected, Registering contacts in the favorites list in a different way (from the "Contact Details" screen) 1. Display the phone screen. 2. Select the "Contacts" tab or the "Call History" tab and select the desired contact. 3. Select "Add Favorite". 4. Check that a confirmation screen is displayed when the operation is complete. ■ Deleting the contacts in the favorites list 1. Select "Remove Favorite". 2. Select the desired contacts and select "Remove". 3. Select "Yes" when the confirmation screen appears. 4. Check that a confirmation screen is displayed when the operation is complete. Deleting contacts in the favorites list in a different way (from the "Contacts" screen) 1. Display the phone screen. 2. Select the "Contacts" tab. 3. Select When selected, Deleting contacts in the favorites list in a different way (from the "Contact Details" screen) 1. Display the phone screen. 2. Select the "Contacts", "Call history" tab or the "Favorites" tab and select the desired contact to delete. 3. Select "Remove Favorite". 4. Select "Yes" when the confirmation screen appears. 5. Check that a confirmation screen is displayed when the operation is complete. Message Settings 1. Display the "Phone/Message Settings" screen. 2. Select "Messaging Settings". 3. Select the desired item to be set.
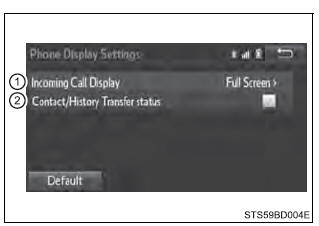
■To return to the default settings Select "Default", and then "Yes". ■ Displaying the "Messaging Settings" screen in a different way 1. Display the phone screen. 2. Select 3. Select "Settings". Phone Display Settings 1. Display the "Phone/Message Settings" screen. 2. Select "Phone Display Settings". 3. Select the desired item to be set.
|
Toyota Tundra Owners Manual > Using an external device: Listening to an iPod
Connecting an iPod enables you to enjoy music from the vehicle speakers. Select "iPod" on the "Select Audio Source" screen. When the iPod connected to the system includes iPod video, the system can only output the sound by selecting the browse screen. Audio control screen "Select Audio Source" scre ...

 icon
corresponding to the desired name or number.
icon
corresponding to the desired name or number. at the
beginning of the desired contact list name to be
registered in the favorites list.
at the
beginning of the desired contact list name to be
registered in the favorites list. , and the contact is
registered in
the favorites list.
, and the contact is
registered in
the favorites list.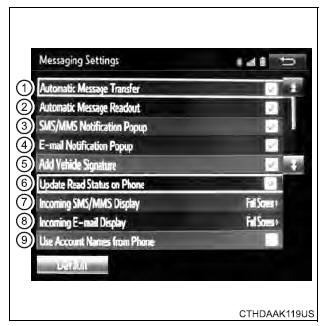
 .
.