Toyota Tundra Service Manual: Installation

INSTALLATION

CAUTION / NOTICE / HINT

HINT:

Perform "Inspection After Repairs" after replacing the fuel injector (See page ).

PROCEDURE

1. INSTALL FUEL INJECTOR ASSEMBLY

HINT:

Perform "Inspection After Repairs" after replacing the fuel injector (See page ).

(a) Attach the 3 clamps to install the No. 6 wire harness to the fuel delivery pipe sub-assembly RH.

(b) Attach the 3 clamps to install the No. 7 wire harness to the fuel delivery pipe sub-assembly LH.

(c) Apply gasoline or spindle oil to a new O-ring and install it to the fuel injector assembly.

NOTICE:

Make sure that there is no damage or foreign material in the groove of the fuel injector assembly when installing the O-ring.

(d) Connect the injector connector.

(e) Install the fuel injector assembly to the fuel delivery pipe sub-assembly as shown in the illustration.

NOTICE:

  • Make sure that there are no scratches or foreign matter in or around the insertion hole of the fuel delivery pipe sub-assembly.
  • When inserting the fuel injector assembly, be careful not to damage the O-ring.
  • Attach the part of the fuel injector labeled B between the parts of the fuel delivery pipe labeled A.

(f) Check that each fuel injector assembly is installed to the fuel delivery pipe sub-assembly facing the direction shown in the illustration.

2. INSTALL FUEL DELIVERY PIPE SUB-ASSEMBLY LH

(a) Install the 2 delivery pipe spacers and 4 insulators to the cylinder head sub-assembly LH.

(b) Install the fuel delivery pipe sub-assembly LH (with injectors) to the cylinder head sub-assembly LH.

(c) Install the 2 bolts.

Torque:

21 N·m {214 kgf·cm, 15 ft·lbf}
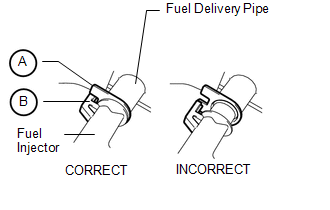
NOTICE:

Make sure that the part of the fuel injector labeled B is between the parts of the fuel delivery pipe labeled A.

(d) Connect the No. 7 wire harness connector.

3. INSTALL FUEL DELIVERY PIPE SUB-ASSEMBLY RH

(a) Install the 2 delivery pipe spacers and 4 insulators to the cylinder head sub-assembly RH.

(b) Install the fuel delivery pipe sub-assembly RH (with injectors) to the cylinder head sub-assembly RH.

(c) Install the 2 bolts.

Torque:

21 N·m {214 kgf·cm, 15 ft·lbf}
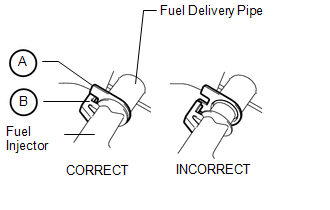
NOTICE:

Make sure that the part of the fuel injector labeled B is between the parts of the fuel delivery pipe labeled A.

(d) Connect the No. 6 wire harness connector.

4. CONNECT NO. 1 FUEL PIPE SUB-ASSEMBLY

(a) Connect the No. 1 fuel pipe sub-assembly to the fuel delivery pipe sub-assembly LH (for Quick Type B) (See page ).

(b) Attach the clamp.

5. CONNECT FUEL TUBE SUB-ASSEMBLY

(a) Connect the fuel tube sub-assembly to the fuel delivery pipe sub-assembly LH (for Quick Type A) (See page ).

(b) Connect the fuel tube sub-assembly to the fuel delivery pipe sub-assembly RH (for Quick Type A) (See page ).

6. CONNECT NO. 2 FUEL TUBE SUB-ASSEMBLY

(a) Connect the No. 2 fuel tube sub-assembly to the fuel pressure regulator assembly (for Quick Type A) (See page ).

7. INSTALL EGR VALVE BRACKET

(See page )

8. CONNECT CABLE TO NEGATIVE BATTERY TERMINAL

9. CHECK FOR FUEL LEAK

(a) Connect the Techstream to the DLC3.

(b) Turn the ignition switch to ON and Techstream main switch on.

NOTICE:

Do not start the engine.

(c) Enter the following menus: Powertrain / Engine and ECT / Active Test / Control the Fuel Pump / Speed.

(d) Check that there are no fuel leaks after doing maintenance anywhere on the fuel system.

    Inspection

    Removal

    See More:

    Toyota Tundra Service Manual > Pre-collision System: Diagnostic Trouble Code Chart
    DIAGNOSTIC TROUBLE CODE CHART Pre-collision System DTC No. Detection Item Link C1A02 Vehicle Information Not Obtained C1A10 Front Radar Sensor C1A11 Front Radar Sensor Incorrect Axial Gap C1A14 Front Radar Sensor Beam Axis Not Adjusted C1A46 Yaw Rate Sensor C1A47 Steering Angle Sensor C1A4A Skid Con ...

    Toyota Tundra Owners Manual

    Toyota Tundra Service Manual

    © 2024 Copyright www.ttundra.com
    0.0106