INSTALLATION CAUTION / NOTICE / HINT HINT:
PROCEDURE 1. INSTALL FRONT SEAT ASSEMBLY LH (a) Place the front seat assembly LH in the cabin. NOTICE: Be careful not to damage the vehicle body.
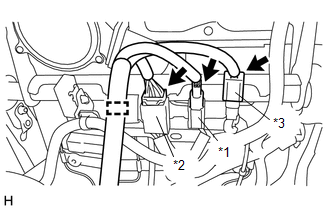
(c) Connect the connector of the front seat wire LH. (d) Connect the connector of the front seat inner belt assembly LH and attach the wire harness clamp under the seat. Text in Illustration
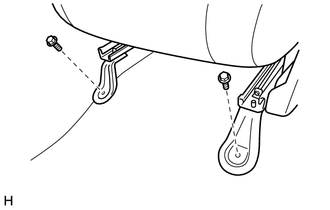
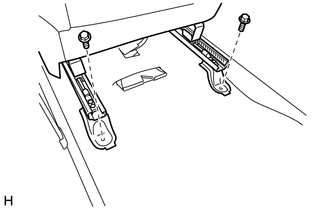
(e) Align the pin of the front seat with the hole in the vehicle. (f) Temporarily install the front seat assembly LH with the 4 bolts. (g) Connect the cable to the negative (-) battery terminal. NOTICE: When disconnecting the cable, some systems need to be initialized after the cable
is reconnected (See page (h) w/ Leg Support Adjustment Switch: Operate the seat variable cushion switch to move the seat to the rearmost position. (i) w/ Vertical Adjuster: Operate the front power seat switch LH (vertical switch) to move the seat to the lowermost position. (j) Operate the front power seat switch LH (slide switch) to move the seat to the rearmost position.
(l) Operate the front power seat switch LH (slide switch) to move the seat to the foremost position.
(n) During the sliding operation of the front seat, check that the left and right adjusters move together smoothly and lock simultaneously. If the seat adjusters do not lock simultaneously, loosen the seat mounting bolts to adjust the adjuster position. 2. INSTALL INNER SEAT TRACK BRACKET COVER LH (a) Attach the clip to install the inner seat track bracket cover LH. 3. INSTALL OUTER SEAT TRACK BRACKET COVER LH (a) Attach the clip to install the outer seat track bracket cover LH. 4. INSTALL FRONT SEAT HEADREST ASSEMBLY (a) Install the front seat headrest assembly. 5. CHECK SRS WARNING LIGHT (See page 6. INSPECT POWER SEAT CONTROL SYSTEM (a) w/o Seat Position Memory System: (See page (b) w/ Seat Position Memory System: (See page 7. INSPECT SEAT HEATER SYSTEM (w/ Seat Heater System) (See page 8. INSPECT CLIMATE CONTROL SEAT SYSTEM (w/ Climate Control Seat System) (See page |
Toyota Tundra Service Manual > Lighting System: Parts Location
PARTS LOCATION ILLUSTRATION *A w/ Automatic High Beam System *B w/ Fog Light *1 HEADLIGHT ASSEMBLY LH *2 HEADLIGHT ASSEMBLY RH *3 FOG LIGHT ASSEMBLY LH *4 FOG LIGHT ASSEMBLY RH *5 OUTER REAR VIEW MIRROR ASSEMBLY LH - OUTER REAR VIEW MIRROR SUB-ASSEMBLY LH - OUTER MIRROR LIGHT ASSEMBLY LH (w/ Door Mi ...