Toyota Tundra Service Manual: Headlight (HI-BEAM) Circuit

DESCRIPTION

The main body ECU (multiplex network body ECU) receives headlight dimmer switch information signals and illuminates the high beam headlights.

WIRING DIAGRAM
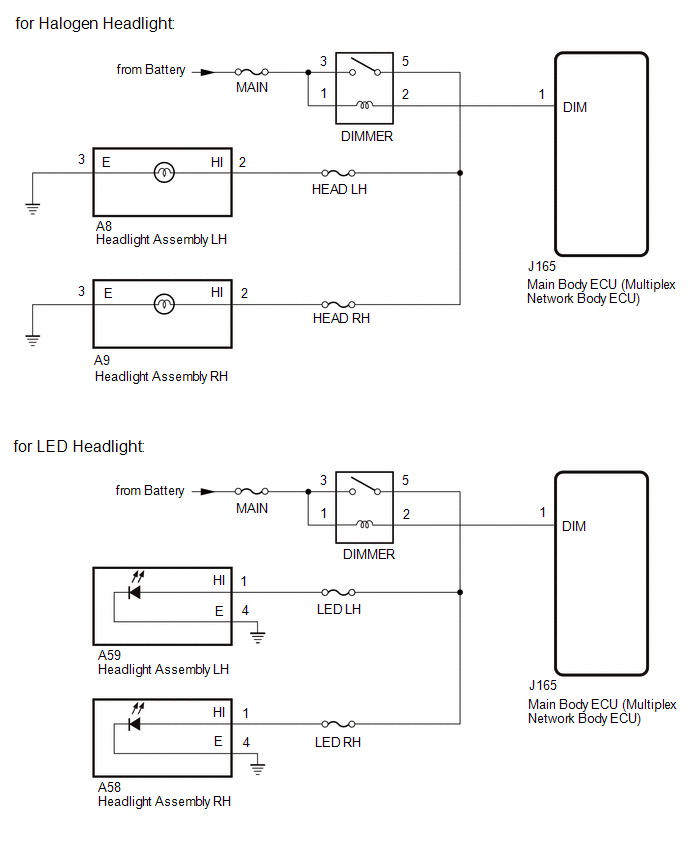
CAUTION / NOTICE / HINT

NOTICE:

Inspect the fuses for circuits related to this system before performing the following procedure.

PROCEDURE

1.

PERFORM ACTIVE TEST USING TECHSTREAM

(a) Using the Techstream, perform the Active Test.

Click here

Main Body

Tester Display

Test Part

Control Range

Diagnostic Note

Head Light Hi

Headlight dimmer relay (DIMMER)

OFF or ON

-

OK:

Headlight dimmer relay (DIMMER) operates (high beam headlights turn on).

OK

PROCEED TO NEXT SUSPECTED AREA SHOWN IN PROBLEM SYMPTOMS TABLE

NG

2.

INSPECT HEADLIGHT DIMMER RELAY (DIMMER)

(a) Remove the headlight dimmer relay (DIMMER) from the engine room relay block and junction block.

(b) Inspect the headlight dimmer relay (DIMMER).

Click here

NG

REPLACE HEADLIGHT DIMMER RELAY (DIMMER)

OK

3.

CHECK HARNESS AND CONNECTOR (HEADLIGHT DIMMER RELAY [DIMMER] - BATTERY)

(a) Remove the headlight dimmer relay (DIMMER) from the engine room relay block and junction block.

*a

Front view of wire harness connector

(to Headlight Dimmer Relay [DIMMER])

(b) Measure the voltage according to the value(s) in the table below.

Standard Voltage:

Tester Connection

Condition

Specified Condition

Headlight dimmer relay (DIMMER) terminal 3 - Body ground

Always

11 to 14 V

Headlight dimmer relay (DIMMER) terminal 1 - Body ground

Always

11 to 14 V

NG

REPAIR OR REPLACE HARNESS OR CONNECTOR

OK

4.

CHECK HARNESS AND CONNECTOR (HEADLIGHT DIMMER RELAY [DIMMER] - MAIN BODY ECU [MULTIPLEX NETWORK BODY ECU] AND HEADLIGHT ASSEMBLY)

(a) Remove the headlight dimmer relay (DIMMER) from the engine room relay block and junction block.

(b) Disconnect the J165 main body ECU (multiplex network body ECU) connector.

(c) for Halogen Headlight:

(1) Disconnect the A8 headlight assembly LH connector.

(2) Disconnect the A9 headlight assembly RH connector.

(d) for LED Headlight:

(1) Disconnect the A59 headlight assembly LH connector.

(2) Disconnect the A58 headlight assembly RH connector.

(e) Measure the resistance according to the value(s) in the table below.

Standard Resistance:

for Halogen Headlight

Tester Connection

Condition

Specified Condition

Headlight dimmer relay (DIMMER) terminal 2 - J165-1 (DIM)

Always

Below 1 Ω

Headlight dimmer relay (DIMMER) terminal 5 - A8-2 (HI)

Always

Below 1 Ω

Headlight dimmer relay (DIMMER) terminal 2 or J165-1 (DIM) - Body ground

Always

10 kΩ or higher

Headlight dimmer relay (DIMMER) terminal 5 or A8-2 (HI) - Body ground

Always

10 kΩ or higher

for LED Headlight

Tester Connection

Condition

Specified Condition

Headlight dimmer relay (DIMMER) terminal 2 - J165-1 (DIM)

Always

Below 1 Ω

Headlight dimmer relay (DIMMER) terminal 5 - A59-1 (HI)

Always

Below 1 Ω

Headlight dimmer relay (DIMMER) terminal 2 or J165-1 (DIM) - Body ground

Always

10 kΩ or higher

Headlight dimmer relay (DIMMER) terminal 5 or A59-1 (HI) - Body ground

Always

10 kΩ or higher

OK

REPLACE MAIN BODY ECU (MULTIPLEX NETWORK BODY ECU)

NG

REPAIR OR REPLACE HARNESS OR CONNECTOR

    Hazard Warning Switch Circuit

    Headlight Dimmer Switch Circuit

    See More:

    Toyota Tundra Owners Manual > Driving: Refueling
    Opening the fuel tank cap Perform the following steps to open the fuel tank cap: Before refueling the vehicle Turn the engine switch to the "LOCK" position and ensure that all the doors and windows are closed. Confirm the type of fuel. ■E85 Fueling Stations (Flex-fuel vehicles) E85 fueling station ...

    Toyota Tundra Owners Manual

    Toyota Tundra Service Manual

    © 2024 Copyright www.ttundra.com
    0.0105