REMOVAL PROCEDURE 1. REMOVE FRONT SEAT ASSEMBLY (for Manual Seat) Click here 2. REMOVE FRONT SEAT ASSEMBLY (for Power Seat) Click here 3. REMOVE FRONT SEAT ASSEMBLY (for Center Seat) Click here 4. REMOVE REAR SEAT ASSEMBLY Click here 5. REMOVE FRONT DOOR SCUFF PLATE LH Click here 6. REMOVE FRONT DOOR SCUFF PLATE RH Click here 7. REMOVE REAR DOOR SCUFF PLATE LH Click here 8. REMOVE REAR DOOR SCUFF PLATE RH Click here 9. REMOVE REAR DOOR OPENING TRIM WEATHERSTRIP LH (a) Partially remove the front door opening trim weatherstrip LH so that the quarter trim panel front LH and quarter trim panel lower LH can be removed. Click here 10. REMOVE REAR DOOR OPENING TRIM WEATHERSTRIP RH HINT: Use the same procedures described for the LH side. 11. REMOVE LOWER QUARTER TRIM PANEL ASSEMBLY LH Click here 12. REMOVE LOWER QUARTER TRIM PANEL ASSEMBLY RH Click here 13. REMOVE FRONT QUARTER TRIM PANEL ASSEMBLY LH Click here 14. REMOVE FRONT QUARTER TRIM PANEL ASSEMBLY RH HINT: Use the same procedures described for the LH side. 15. REMOVE NO. 1 ROOM LIGHT ASSEMBLY Click here 16. REMOVE COAT HOOK Click here 17. REMOVE NO. 1 BACK PANEL SILENCER (for Power Slide Type) 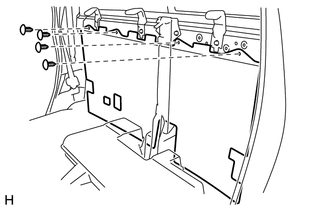
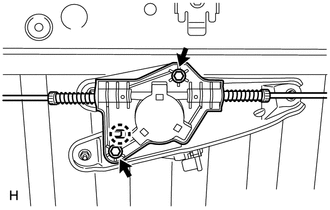
(a) Using a clip remover, remove the 4 clips and No. 1 back panel silencer. 18. REMOVE DOOR WINDOW REGULATOR CABLE SUB-ASSEMBLY (for Power Slide Type) (a) Using a clip remover, detach the 6 clips labeled A in the illustration. (b) Compress the springs to release the tension in the cables, and then disconnect the wire ends from the back window shown in the illustration labeled B. (c) Pull out the wires from the back window shown in the illustration labeled C. 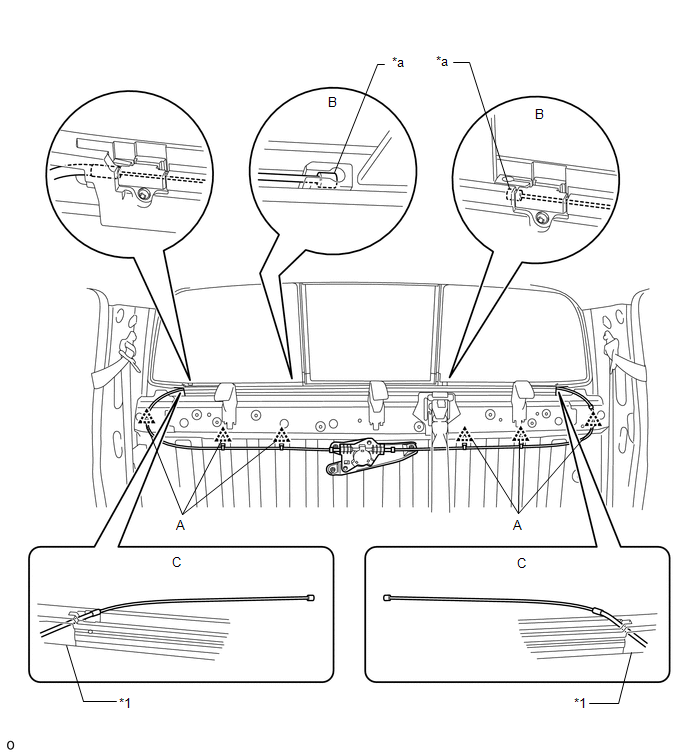
(e) Detach the claw and remove the door window regulator cable sub-assembly. 19. REMOVE DOOR WINDOW REGULATOR BASE PLATE (for Power Slide Type) 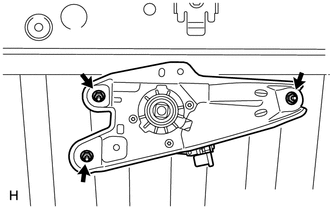
(a) Remove the 3 nuts and door window regulator base plate. 20. REMOVE POWER WINDOW REGULATOR MOTOR ASSEMBLY (for Power Slide Type) 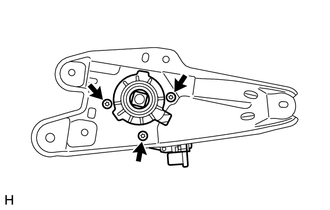
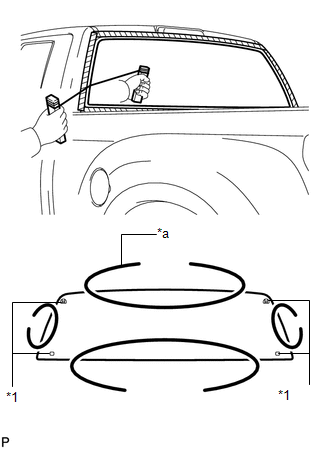
(a) Using a T25 "TORX" socket, remove the 3 screws and power window regulator motor. 21. REMOVE BACK WINDOW GLASS HINT: Perform these procedures only when replacing the back window glass. (a) Using a T10 "TORX" driver, remove the screw and stopper (illustration A). (b) Slightly pull up the seal (arrow 1), and then pull out the seal from the channel in the direction of arrow 2. (c) Slide the back window glass towards the LH side (arrow 3). Lower the back window glass into the channel and tilt it (arrow 4) to detach the upper part of the back window glass from the upper channel. Then remove the back window glass (arrow 5). 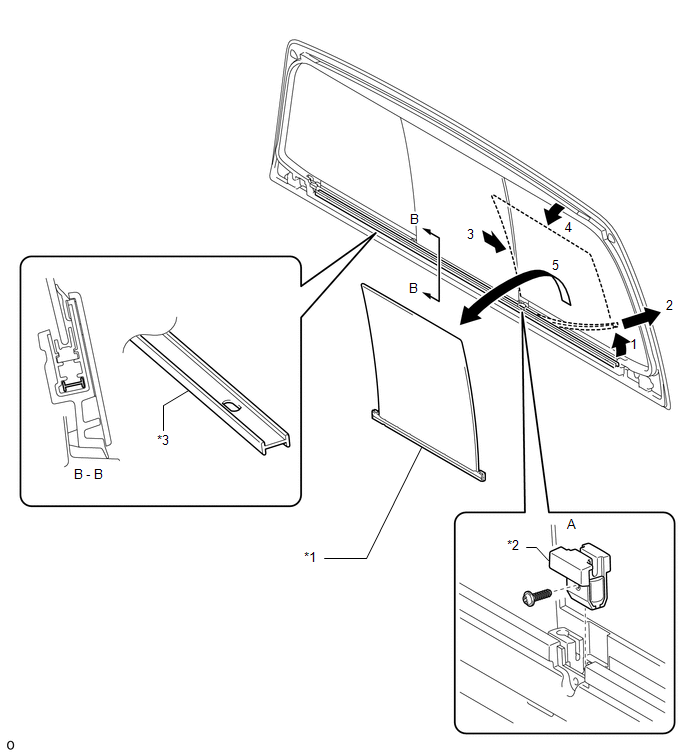
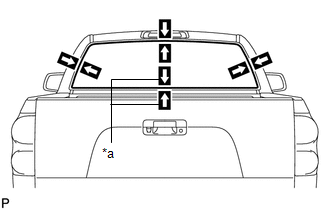
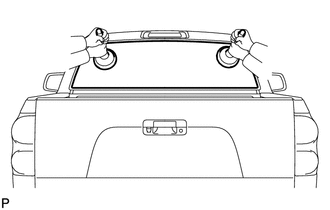
22. TEMPORARILY REMOVE ROOF HEADLINING ASSEMBLY (a) It is not necessary to completely remove the roof headlining. Slightly lower the rear section of the roof headlining so that the back window glass can be removed in a later step. Click here 23. REMOVE REAR ROOF DRIP SIDE FINISH MOULDING LH Click here 24. REMOVE REAR ROOF DRIP SIDE FINISH MOULDING RH HINT: Use the same procedures described for the LH side. 25. REMOVE BACK WINDOW ASSEMBLY 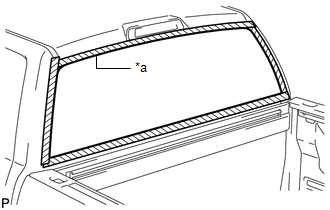
(a) Apply protective tape to the outer surface of the vehicle body to prevent scratches.
(c) Tie objects that can serve as handles (for example, wooden blocks) to both wire ends.
(e) Cut through the adhesive by pulling the piano wire around the back window. NOTICE: Leave as much adhesive on the vehicle body as possible when removing the back window.
26. REMOVE UPPER OUTSIDE BACK WINDOW MOULDING (for Slide Type, for Power Slide Type) 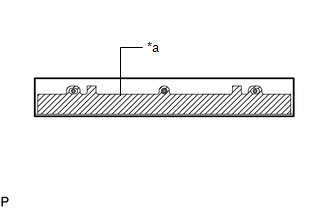
HINT: Perform the following procedure if replacing the back window moulding. (a) Using a moulding remover, detach the 3 clips and remove the back window moulding. 27. REMOVE LOWER OUTSIDE BACK WINDOW MOULDING (for Slide Type, for Power Slide Type) 
HINT: Perform the following procedure if replacing the back window moulding. (a) Using a moulding remover, detach the 3 clips and remove the back window moulding. 28. CLEAN BACK WINDOW ASSEMBLY (a) Using a scraper, remove the damaged spacers and adhesive sticking to the glass.
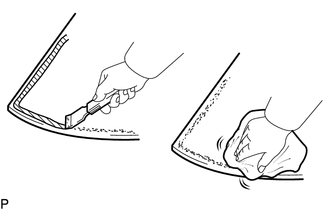
29. CLEAN VEHICLE BODY 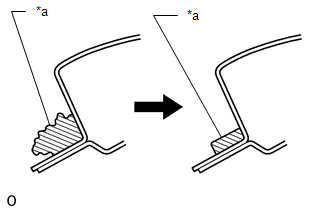
(a) Using a scraper, remove the moulding and adhesive from the vehicle body. (b) Clean and shape the contact surface of the vehicle body. (1) On the contact surface of the vehicle body, use a knife to cut away excess adhesive as shown in the illustration. HINT: Leave as much adhesive on the vehicle body as possible. NOTICE: Be careful not to damage the vehicle body. (2) Clean the contact surface of the vehicle body with cleaner. HINT: Even if all the adhesive has been removed, clean the vehicle body. 30. REMOVE BACK DOOR GLASS CHANNEL |
Toyota Tundra Service Manual > Wireless Door Lock Control System: No Answer-Back
DESCRIPTION In some cases, wireless door lock control functions are normal but the hazard warning light and/or wireless door lock buzzer answer-back function(s) does not operate. In such cases, hazard warning light and wireless door lock buzzer signal outputs from the main body ECU (multiplex networ ...