INSTALLATION CAUTION / NOTICE / HINT HINT: If an exhaust gas leak has been repaired, perform an inspection following the repair (See page
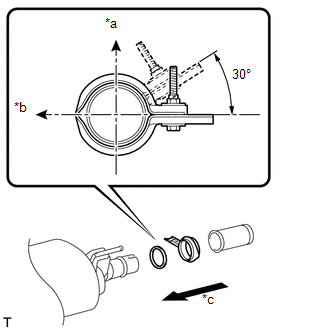
PROCEDURE 1. INSTALL AIR FUEL RATIO SENSOR (for Bank 1 Sensor 1) 2. INSTALL FRONT NO. 2 EXHAUST PIPE ASSEMBLY (a) Connect the front No. 2 exhaust pipe assembly to the exhaust pipe support. (b) Install a new gasket and the front No. 2 exhaust pipe assembly to the exhaust manifold LH with 3 new nuts. Torque: 54 N·m {554 kgf·cm, 40 ft·lbf} 3. INSTALL AIR FUEL RATIO SENSOR (for Bank 2 Sensor 1) 4. INSTALL FRONT EXHAUST PIPE ASSEMBLY (a) Install a new gasket and the front exhaust pipe assembly to the exhaust manifold with 3 new nuts. Torque: 54 N·m {554 kgf·cm, 40 ft·lbf} 5. INSTALL CENTER EXHAUST PIPE ASSEMBLY (a) Connect the center exhaust pipe assembly to the 3 exhaust pipe supports. (b) Install 2 new gaskets to the front exhaust pipe assembly and front No. 2 exhaust pipe assembly. (c) Install the center exhaust pipe assembly with the 4 bolts. Torque: 48 N·m {489 kgf·cm, 35 ft·lbf} 6. INSTALL TAILPIPE ASSEMBLY (a) Connect the tailpipe assembly to the exhaust pipe support. (b) Install a new gasket to the center exhaust pipe assembly.
7. INSTALL HEATED OXYGEN SENSOR (See page
8. INSPECT FOR EXHAUST GAS LEAK HINT: If an exhaust gas leak has been repaired, perform an inspection following the repair (See page
If gas is leaking, tighten the areas necessary to stop the leak. Replace damaged parts as necessary. |
Toyota Tundra Service Manual > Can Communication System: Center Airbag Sensor Communication Stop Mode
DESCRIPTION Detection Item Symptom Trouble Area Center Airbag Sensor Communication Stop Mode Any of the following conditions are met: Communication stop for "Airbag" is indicated on the "Communication Bus Check" screen of the Techstream. Communication system DTCs (DTCs that start with U) that corres ...

 ).
).